အခန်း ၉ ။ Tree
ကျွန်တော်တို့တွေဟာ ပြီးခဲ့သည့် အခန်းတွေမှာ data structure ပိုင်းတွေ ဖြစ်သည့် stack , queue , search , sort စသည့် အပိုင်းတွေကို သိပြီးသွားပါပြီ။ အခု အခါမှာတော့ data stucture ပိုင်းမှာ မဖြစ်မနေ သိသင့်သည့် tree အကြောင်းကို ဖော်ပြပါမယ်။
Tree ကို computer science ပိုင်းတွေ နေရာ တော်တော်များများ မှာ အသုံးပြုကြပါတယ်။ Operating Systems, graphic, database system နှင့် အခြား computer networking စသည့် နေရာ အတော်များများမှာ Tree data structure က မပါမဖြစ်ပါ။ ဒါကြောင့် Programming ကို လေ့လာမည့် သူများ အနေနှင့် Tree အကြောင်းကို မဖြစ်မနေ သိထားဖို့ လိုအပ်ပါတယ်။
သစ်ပင် တစ်ခုမှာ အောက်ခြေမှာ root (အမြစ်) ရှိပြီးတော့ အထက်ပိုင်းမှာ branches(ကိုင်းများ) ခွဲထွက်ပါတယ်။ ကျွန်တော်တို့ အခု tree မှာတော့ အထက်ပိုင်းက root ဖြစ်ပြီးတော့ အောက်ဘက်မှာ branches တွေ ခွဲ ပါတယ်။
ဥပမာ Linux က file system တစ်ခု ရဲ့ ပုံစံ အကြမ်းသဘောတရားလေးကို ကြည့်ရအောင်။
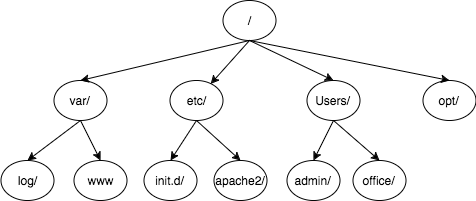
ထိပ်ဆုံးမှာ root (/) ရှိပါတယ်။ သူ့အောက်မှာ အခြား folder တွေ ဖြစ်သည့် var,etc,Users,opt စသည့် folder တွေ ပါဝင်ပါတယ်။ အဲဒီ folder တွေ အောက်မှာ အခြား folder တွေ ထပ်ပြီးတော့ ရှိသေးတယ်။ အဲဒါက tree system တစ်ခုပါပဲ။
နောက်ပြီးတော့ ကျွန်တော်တို့ နေ့စဉ် တွေ့မြင်နေကျ ဖြစ်သည့် website တွေကို HTML ဖြင့် တည်ဆောက်ထားပါတယ်။ HTML code example လေးကို အောက်မှာ ဖော်ပြထားပါတယ်။
<html>
    <head>
        <meta charset="UTF-8" />
        <title>Simple</title>
    </head>
    <body>
        <h1>Simple Website</h1>
        <ul>
            <li>List item one</li>
            <li>List item two</li>
        </ul>
        <h2><a href="https://www.comquas.com">COMQUAS</a></h2>
    </body>
</html>
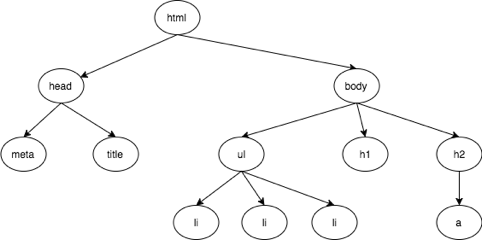
HTML ဟာလည်း tree structure ပါပဲ။ HTML ကို tree structure နဲ့ ဆွဲကြည့်ရင် အောက်က ပုံလို မြင်ရပါမယ်။
Tree structure ဟာ နေရာမျိုးစုံမှာ လိုသလို အသုံးပြုနေရပါတယ်။ ဒီ အခန်းမှာတော့ binary tree ကို အဓိကထားပြီးတော့ ဖော်ပြပေးသွားမှာပါ။
Binary Tree
Tree အကြောင်းကို လေ့လာတော့မယ်ဆိုရင် ဦးစွာ Binary Tree အကြောင်းကို နားလည် ဖို့ လိုပါတယ်။
Binary Tree ဆိုတာကတော့ Node တစ်ခု အောက်မှာ branch ၂ ခု ပဲ ရှိရမယ်။ အနည်းဆုံး branch 0 ကနေ 2 အဓိပဲ ရှိသည့် tree system တစ်ခုပါ။
အခု Binary Tree ဥပမာ လေး ကြည့်ရအောင်။
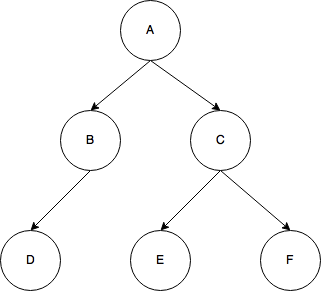
A ရဲ့ အောက်မှာ B နှင့် C ရှိတယ်။ B အောက်မှာ D ရှိတယ်။ C အောက်မှာတော့ E နဲ့ F ရှိပါတယ်။ ဒီ ပုံ တစ်ခုလုံးကိုတော့ tree လို့ ဆိုနိုင်တယ်။ A,B,C,D,E,F တွေကတော့ Node တွေပါ။ Binary tree ရဲ့ Node မှာ left နဲ့ right ရှိပါတယ်။ left ဘက်က child နဲ့ right ဘက်က child ပေါ့။ Node A ရဲ့ left ကတော့ B Node ဖြစ်ပြီးတော့ right ကတော့ C Node ပေါ့။ B Node ရဲ့ left ကတော့ Node D ဖြစ်ပြီး right ကတော့ empty ဖြစ်နေပါတယ်။ C ရဲ့ left ကတော့ E Node ဖြစ်ပြီးတော့ right node ကတော့ F ဖြစ်နေပါတယ်။
ဒါဆိုရင် ကျွန်တော်တို့ binary tree တစ်ခု ကို တည်ဆောက်ကြည့်ရအောင်။ ကျွန်တော်တို့ဆီမှာ BinaryTree class တစ်ခုရှိမယ်။ left_child နဲ့ right_child ရှိမယ်။ အဲဒီ ၂ ခု လုံးက လည်း BinaryTree class တွေ ဖြစ်ရမယ်။ နောက် တစ်ခုက လက်ရှိ root key ရှိရမယ်။
class BinaryTree:
    def __init__(self,root):
        self.key = root
        self.left_child = None
        self.right_child = None
နောက်တဆင့် အနေနဲ့ စဉ်းစားရင် left နှင့် right ထည့်ဖို့ လိုမယ်။ အဲဒီမှာ ဘာကို ထပ်ပြီး စဉ်းစားဖို့ လိုလဲဆိုတော့ left ထဲမှာ data ရှိနေရင် အသစ်ထည့်လိုက်သည့် tree ထဲမှာ append သွားလုပ်ဖို့လိုတယ်။ right ထဲမှာ data ရှိနေရင်လည်း အသစ်ထည့်မယ့် tree ထဲမှာ append လုပ်ဖို့ လိုပါတယ်။
ဥပမာ။
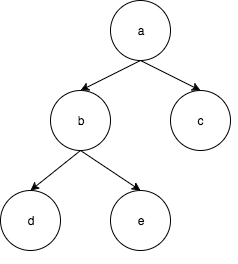
အထက်က ပုံလေးဆိုရင် Node အသစ် မထည့်ရသေးဘူး။ အဲဒီ အထဲမှာ ကျွန်တော် k Node လေး ကို left ဘက်မှာ ထည့်လိုက်ရင် အောက်ကလို ဖြစ်သွားပါမယ်။

ဒါကြောင့် insert မှာ ကျွန်တော်တို့ အနေနဲ့ data ရှိပြီးသားလား မရှိရသေးဘူးလား စစ်ဖို့ လိုမယ်။ မရှိသေးဘူးဆိုရင် တစ်ခါတည်း ထည့်မယ်။ ရှိမယ် ဆိုရင်တော့ လက်ရှိ ရှိနေသည့် node ကို node အသစ်မှာ လာထည့်ဖို့လိုပါလိမ့်မယ်။
class BinaryTree:
    def __init__(self,root):
        self.key = root
        self.left_child = None
        self.right_child = None

    def insert_left(self,new_node):
        if self.left_child == None:
            self.left_child = BinaryTree(new_node)
        else:
            t = BinaryTree(new_node)
            t.left_child = self.left_child
            self.left_child = t

    def insert_right(self,new_node):
        if self.right_child == None:
            self.right_child = BinaryTree(new_node)
        else:
            t = BinaryTree(new_node)
            t.right_child = self.right_child
            self.right_child = t
အခု ထပ်ပြီးတော့ ရှိသည့် left, right ကို ဆွဲထုတ်ဖို့ ရေးရအောင်။
class BinaryTree:
    def __init__(self,root):
        self.key = root
        self.left_child = None
        self.right_child = None

    def insert_left(self,new_node):
        if self.left_child == None:
            self.left_child = BinaryTree(new_node)
        else:
            t = BinaryTree(new_node)
            t.left_child = self.left_child
            self.left_child = t

    def insert_right(self,new_node):
        if self.right_child == None:
            self.right_child = BinaryTree(new_node)
        else:
            t = BinaryTree(new_node)
            t.right_child = self.right_child
            self.right_child = t

    def get_right_child(self):
        return self.right_child

    def get_left_child(self):
        return self.left_child

    def set_root_val(self,obj):
        self.key = obj

    def get_root_val(self):
        return self.key
အခု အချိန်မှာတော့ code လေးတွေက ခက်ခက်ခဲခဲမဟုတ်ပဲ နဲ့နားလည် နိုင်ပါတယ်။
ကျွန်တော်တို့ရဲ့ Binary Tree ကို စမ်းကြည့်ရအောင်။
class BinaryTree:

    def __repr__(self):
        return "Binary Tree, Key is " + self.key

    def __init__(self,root):
        self.key = root
        self.left_child = None
        self.right_child = None

    def insert_left(self,new_node):
        if self.left_child == None:
            self.left_child = BinaryTree(new_node)
        else:
            t = BinaryTree(new_node)
            t.left_child = self.left_child
            self.left_child = t

    def insert_right(self,new_node):
        if self.right_child == None:
            self.right_child = BinaryTree(new_node)
        else:
            t = BinaryTree(new_node)
            t.right_child = self.right_child
            self.right_child = t

    def get_right_child(self):
        return self.right_child

    def get_left_child(self):
        return self.left_child

    def set_root_val(self,obj):
        self.key = obj

    def get_root_val(self):
        return self.key


    def postorder(self):
        if self != None:
            if self.get_left_child() != None:
                self.get_left_child().postorder()
            if self.get_right_child() != None:
                self.get_right_child().postorder()
            print(self.get_root_val())


from binarytree import BinaryTree

root = BinaryTree('a')

print(root)

print(root.get_root_val())
print(root.get_left_child())

root.insert_left('b')
print(root.get_left_child().get_root_val())

root.insert_right('c')
print(root.get_right_child().get_root_val())

root.get_right_child().set_root_val('hello')
print(root.get_right_child().get_root_val())

root.insert_left('d')
print(root.get_left_child())
print(root.get_left_child().get_left_child().get_root_val())
အဲဒီမှာ
def __repr__(self):
        return "Binary Tree, Key is " + self.key
ဆိုတာလေးကို တွေ့ရလိမ့်မယ်။ အဲဒါကတော့ ကျွန်တော်တို့ object ကို print နဲ့ ထုတ်သည့် အခါမှာ <__main__.BinaryTree object at 0x10293b5f8> ဆိုပြီး မပေါ်ချင်ပဲ key ကို ထုတ်ပြချင်သည့် အတွက်ကြောင့် __repr__ ဆိုသည့် function မှာ ဝင်ရေးထားတာပါ။
root.insert_left('d') print(root.get_left_child()) print(root.get_left_child().get_left_child().get_root_val()) ဒီ code ဆိုရင်လည်း a ရဲ့ left မှာ b ရှိတယ်။ ထပ်ပြီးတော့ d ကိုထည့်လိုက်တယ်။ ပြီးမှ a ရဲ့ left child ရဲ့ left child ကို ပြန်ပြီးတော့ print ထုတ်ထားတာပါ။ a ရဲ့ left child က d ဖြစ်သွားပြီးတော့ d ရဲ့ left child ကတော့ b ဖြစ်သွားတာကို တွေ့ရပါလိမ့်မယ်။
Parse Tree
အခု Tree ကို အသုံးပြုပြီးတော့ parse tree တစ်ခု ကို ဖန်တီးရအောင်။ နားလည် အောင် သဘောပြောရရင်တော့ ((9 + 4) * (6 − 2)) ကို parse tree ထုတ်လိုက်ရင် အောက်ပါ ပုံအတိုင်း ထွက်လာပါလိမ့်မယ်။

အထက်ပါ diagram ကို ကြည့်လိုက်ရင် ရိုးရှင်းပါတယ်။ ၉ နှင့် ၄ ကို အရင် ပေါင်းမယ်။ ပြီးရင် ၆ ထဲ က ၂ ကို နှုတ်မယ်။ ပြီးရင် ပြန်မြှောက်မယ်။
အခု ကျွန်တော်တို့တွေအနေနဲ့ User က ပေးလိုက်သည့် parser ပေါ်မှာ မူတည်ပြီးတော့ parse tree တစ်ခု တည်ဆောက်ပါမယ်။
ဦးစွာ ကျွန်တော်တို့တွေ တည်ဆောက်ဖို့အတွက် rule လေးတွေ ကြည့်ပါမယ်။
၁။ ( ပါ လာခဲ့ရင် node အသစ်တစ်ခုကို လက်ရှိ node ရဲ့ ဘယ်ဘက် child မှာ တည်ဆောက်ဖို့ လိုပါတယ်။
၂။ + , - , * , / တစ်ခု ဖြစ်ရင်တော့ လက်ရှိ node ရဲ့ value ကို ရလာသည့် သင်္ကေတ ကို ထည့်ပါမယ်။ ညာဘက်မှာ node အသစ်တစ်ခု တည်ဆောက်ပါမယ်။
၃။ value ကတော့ နံပတ် ဖြစ်နေရင် လက်ရှိ node ရဲ့ value ကို အဲဒီ နံပတ် ထည့်မယ် ပြီးရင် သူ့ရဲ့ parent node ကို ပြန်သွားပါမယ်။ ဒါကြောင့် current node က သူ့ရဲ့ parent node ဖြစ်သွားပါလိမ့်မယ်။
၄။ ) တွေ့ခဲ့ရင်လည်း parent node ဆီ ပြန်သွားဖို့ပါပဲ။
အခု ကျွန်တော်တို့တွေ ((9 + 4) * (6 − 2)) ကို စမ်းကြည့်ရအောင်။
( တွေ့သည့် အတွက် left child တစ်ခု တည်ဆောက်ပါမယ်။

( ထပ်တွေ့သည့် အတွက် ထပ်ပြီးတော့ left child တစ်ခု ထပ်ဆောက်ပါမယ်။

9 ကို တွေ့သည့်အတွက် value ကို ထည့်ပြီးတော့ parent node ကို ပြန်သွားပါမယ်။

+ ကို တွေ့သည့် အတွက်ကြောင့် value ထည့်ပြီးတော့ right child တစ်ခု ဆောက်ပါမယ်။

4 ကို တွေ့သည့် အတွက်ကြောင့် value ထည့်ပြီးတော့ parent ကို ပြန်သွားပါမယ်။

) ကို တွေ့သည့် အတွက်ကြောင့် parent node ကို ပြန်သွားပါမယ်။

* ကို တွေ့သည့် အတွက်ကြောင့် value ထည့်ပြီးတော့ right child ကို ဆောက်ပါမယ်။

( ကို တွေ့သည့် အတွက် ကြောင့် left child ဆောက်ပါမယ်။

6 ကို တွေ့သည့် အတွက်ကြောင့် value ထည့်မယ်။ parent ကို ပြန်သွားပါမယ်။

- ကို တွေ့သည့် အတွက်ကြောင့် value ထည့်မယ်။ right child ကို ဆောက်ပါမယ်။

2 ကို တွေ့သည့် အတွက်ကြောင့် value ထည့်မယ်။ parent node ကို ပြန်သွားမယ်။

) ကို တွေ့သည့် အတွက်ကြောင့် parent node ကို ထပ်သွားပါမယ်။

) ကို တွေ့တယ်။ parent ကို ထပ်သွားတယ်။ ဒါပေမယ့် parent မရှိတော့သည့် အတွက် current node မှာ ဘာမှ မရှိတော့ပါဘူး။ ကျွန်တော်တို့လည်း parse tree ဆွဲလို့ပြီးပါပြီ။
အခု ကျွန်တော်တို့ parse tree ကို code အနေနဲ့ ရေးကြည့်ရအောင်။
from binarytree import BinaryTree
from stack import Stack

def build_parse_tree(fp_exp):
    fp_list = fp_exp.split()
    p_stack = Stack()
    e_tree = BinaryTree('')
    p_stack.push(e_tree)
    current_tree = e_tree
    for i in fp_list:

        if i == '(':
            current_tree.insert_left('')
            p_stack.push(current_tree)
            current_tree = current_tree.get_left_child()
        elif i not in ['+', '-', '*', '/', ')']:
                current_tree.set_root_val(int(i))
                parent = p_stack.pop()
                current_tree = parent
        elif i in ['+', '-', '*', '/']:
            current_tree.set_root_val(i)
            current_tree.insert_right('')
            p_stack.push(current_tree)
            current_tree = current_tree.get_right_child()
        elif i == ')':
            current_tree = p_stack.pop()
        else:
            raise ValueError
    return e_tree

pt = build_parse_tree("( ( 9 + 4 ) * ( 6 - 2 ) )")
pt.postorder()
အခု code မှာ ကျွန်တော်တို့တွေ binary tree နဲ့ stack ကို သုံးထားတာကို တွေ့နိုင်ပါတယ်။ အဲဒီမှာ ထူးထူးခြားခြား postorder ဆိုတာ ပါလာပါတယ်။ ဒီအကြောင်းကို နောက် အခန်းမှာ ဆက်ရှင်းပြပါမယ်။
Tree Traversals
Tree traversals ဆိုတာကတော့ tree တစ်ခုမှာ node တစ်ခု ခြင်းဆီ ကို သွားသည့် process လို့ ဆိုရပါမယ်။ Tree Traversals ၂ မျိုး ရှိပါတယ်။
Depth-first search Breadth-first search
ဆိုပြီး ရှိပါတယ်။
Depth-first search (DFS)
DFS ကို အသုံးပြုပြီး data တွေကို ပြန်ပြီး ထုတ်ပြဖို့ အတွက် ထုတ်ပြနည်း ၃ ခု ရှိပါတယ်။
- in order
- pre order
- post order
ဆိုပြီး ရှိပါတယ်။
In Order
In order ဆိုတာကတော့ ဘယ်ဘက် က data ကို ပြမယ်။ ပြီးမှ center ကို ပြမယ်။ ပြီးရင် ညာဘက် ကို ပြမယ်။

In order အရ ထုတ်မယ် ဆိုရင်
- F
- D
- G
- B
- E
- A
- C
ဆိုပြီး ထုတ်ပါမယ်။ ဘယ်ဘက် က အောက်ဆုံးကို အရင် ထုတ်တယ်။ ပြီးတော့ သူ့ရဲ့ parent ကို ထုတ်ပြတယ်။ ပြီးတော့ ညာဘက် က node ကို ထုတ်တယ်။
ဘယ်ဘက် အောက်ဆုံးက F ဖြစ်ပြီးတော့ F ရဲ့ parent က D ပါ။ ပြီးတော့ ညာဘက် G ကို ထုတ်မယ်။ ညာဘက် node က ဆက်မရှိတော့သည့် အတွက် parent ကို ပြန်သွားမယ်။ parent က လည်း ကိစ္စ ပြီးပြီ ဖြစ်သည့် အတွက် သူ့ရဲ့ parent ကို ပြန်သွားမယ်။ အဲဒီ parent က node ကို B ကို ထုတ်ပြပါတယ်။ ပြီးတော့ ညာဘက် က E ကို ထုတ်ပြတယ်။ parent ကို ပြန်သွားတယ်။ A ကို ထုတ်ပြတယ်။ ပြီးတော့ ညာဘက်က C ကို ထုတ်ပြတယ်။
In order ကတော့ အောက်ဆုံးမှာ ရှိသည့် ဘယ်ဘက် က node ကို အရင်ပြမယ်။ ပြီးရင် parent ကို ပြမယ်။ ပြီးရင် ညာဘက် အောက်ဆုံး ထိ ဆင်းပြီးမှ ပြမယ်။
သွားသည့် flow လေးကို ကြည့်ရအောင်။

အဲဒီ flow လေးကို ကြည့်လိုက်ရင် in order ကို ကောင်းမွန်စွာ နားလည်သွားပါလိမ့်မယ်။
အခု code လေး ကို ကြည့် ရအောင်။
def inorder(self):
    if self != None:
        if self.get_left_child() != None:
            self.get_left_child().inorder()

        print(self.get_root_val())

        if self.get_right_child() != None:
            self.get_right_child().inorder
ကျွန်တော်တို့ recursive ကို သုံးပြီးတော့ left child တွေ အကုန် သွားပါတယ်။ နောက်ဆုံး အဆင့်မှာ root value ကို print ထုတ်ထားတယ်။ ပြီးသွားမှာ parent ရဲ့ value ကို ထုတ်ထားတယ်။ ပြီးရင် right တွေ အကုန်ပြန် ဆင်းချထားတာကို တွေ့နိုင်ပါတယ်။
Pre Order
In Order ကို နားလည်သွားရင်တော့ pre order က node value ကို အရင်ထုတ်ပြီးမှ left ကို သွားတာပါ။ အနည်းငယ် ကွာခြားသွားတယ်။

အဲဒီ ပုံလေးကို pre order အရ ထုတ်မယ်ဆိုရင်တော့
- A
- B
- D
- F
- G
- E
- C
ဆိုပြီး ထွက်လာပါလိမ့်မယ်။
In order ကို နားလည်ထားပြီးပြီတော့ အသေးစိတ် မရှင်းတော့ပါဘူး။ code လေးကို ကြည့်ရအောင်။
def preorder(self):
    if self != None:
        print(self.get_root_val())

        if self.get_left_child() != None:
            self.get_left_child().preorder()

        if self.get_right_child() != None:
            self.get_right_child().preorder()
အရင်ဆုံး node ရဲ့ value ကို ထုတ်လိုက်ပါတယ်။ ပြီးမှ left ကို သွားပါတယ်။ left အကုန်ပြီးမှ right ကို သွားတာကို တွေ့ပါလိမ့်မယ်။
Post Order
Pre order နဲ့ အနည်းငယ်သာ ကွဲပြားပါတယ်။ အရင်ဆုံး left ကို ထုတ်တယ်။ ပြီးမှ right ကို ထုတ်တယ်။ ပြီးမှ node ရဲ့ value ကို ထုတ်မယ်။

အထက်ပါ binary tree ကို ထုတ်မယ်ဆိုရင်
- F
- G
- D
- E
- B
- C
- A
ဆိုပြီး ထွက်လာပါမယ်။
အောက်ဆုံး F က အရင် လာမယ်။ ပြီးရင် ညာဘက်က G လာမယ်။ ပြီးမှ သူ့ရဲ့ parent D လာပါမယ်။ ပြီးရင် ညာဘက် က E လာမယ်။ ပြီးမှ parent B လာပါမယ်။ B ရဲ့ ညာဘက်က C လာမယ်။ ပြီးမှ parent A လာပါမယ်။
code ကတော့ ဆင်တူပါပဲ။
def postorder(self):
    if self != None:
        if self.get_left_child() != None:
            self.get_left_child().postorder()

        if self.get_right_child() != None:
            self.get_right_child().postorder()

        print(self.get_root_val())
အခု ဆိုရင်တော့ ကျွန်တာ်တို့တွေ binary Tree တစ်ခု လုံး ကို သွားတတ်နေပါပြီ။ code လေးကို ကြည့်ရအောင်။
class BinaryTree:

    def __repr__(self):
        return "Binary Tree, Key is " + self.key

    def __init__(self,root):
        self.key = root
        self.left_child = None
        self.right_child = None

    def insert_left(self,new_node):
        if self.left_child == None:
            self.left_child = BinaryTree(new_node)
        else:
            t = BinaryTree(new_node)
            t.left_child = self.left_child
            self.left_child = t

    def insert_right(self,new_node):
        if self.right_child == None:
            self.right_child = BinaryTree(new_node)
        else:
            t = BinaryTree(new_node)
            t.right_child = self.right_child
            self.right_child = t

    def get_right_child(self):
        return self.right_child

    def get_left_child(self):
        return self.left_child

    def set_root_val(self,obj):
        self.key = obj

    def get_root_val(self):
        return self.key


    def inorder(self):
        if self != None:
            if self.get_left_child() != None:
                self.get_left_child().inorder()

            print(self.get_root_val())

            if self.get_right_child() != None:
                self.get_right_child().inorder()


    def postorder(self):
        if self != None:
            if self.get_left_child() != None:
                self.get_left_child().postorder()

            if self.get_right_child() != None:
                self.get_right_child().postorder()

            print(self.get_root_val())

    def preorder(self):
        if self != None:
            print(self.get_root_val())

            if self.get_left_child() != None:
                self.get_left_child().preorder()

            if self.get_right_child() != None:
                self.get_right_child().preorder()

root = BinaryTree("A")

root.insert_left("B")
root.insert_right("C")

b = root.get_left_child()

b.insert_left("D")
b.insert_right("E")

d = b.get_left_child()

d.insert_left("F")
d.insert_right("G")

print("---- In Order ----")
root.inorder()
print("---- Pre Order ----")
root.preorder()
print("---- Post Order ----")
root.postorder()
လေ့ကျင့်ခန်း ၉-၁

၁။ အထက်ပါ binary tree တစ်ခု တည်ဆောက်ပါ။ ထို binary tree အတွက် dfs ကို သုံးပြီး search function ကို ရေးပါ။ ဥပမာ ။ F လို့ ထည့်လိုက်လျှင် binary tree တွင် ပါဝင်သောကြောင့် true ဟု return ပြန်ပါမည်။ H ဟု ထည့်လိုက်လျှင် ရှာ မတွေ့သောကြောင့် false ဟု return ပြန်ရမည်။
Breadth-first search (BFS)
အခု ကျွန်တော်တို့ နောက်တနည်းဖြစ်သည့် BFS ကို အသုံးပြုပြီးတော့ Binary Tree က node တွေကို အဆင့်လိုက်သွားပါမယ်။

ပုံမှာ BFS အရ ဆိုရင်တော့
- A
- B , C
- D , E
- F , G
- ဆိုပြီးတော့ level အဆင့်လိုက် ထုတ်ပြပါလိမ့်မယ်။
ကျွန်တော်တို့တွေ အနေနဲ့ ပထမဆုံး root ကနေ စပါမယ်။ root က A ပါ။ A ရဲ့ left နှင့် right ကို array ထဲမှာ မှတ်ထားတယ်။ B,C ပေါ့။ ပြီးရင် B ရဲ့ left နှင့် right ကို array ထဲမှာ မှတ်ထားမယ်။ D,E ပါ။ C ရဲ့ left နှင့် right ကို ထပ်ပြီးတော့ မှတ်ထားမယ်။ သို့ပေမယ့် C မှာ child မရှိသည့် အတွက်ကြောင့် D,E ပဲ ရှိပါတော့မယ်။ အကယ်၍ C မှာ left နှှင့် right မှာ child ရှိခဲ့လျှင် မှတ်ထားသည့် value က D,E,left Of C, right of C ဖြစ်သွားပါမယ်။ အခုတော့ D,E မှာ D ရဲ့ left နဲ့ right F,G ကို မှတ်ထားပါတယ်။ E မှာ child မရှိသည့် အတွက်ကြောင့် မှတ်ထားသည့် array ထဲမှာ F,G ပဲ ရှိမယ်။ F မှာ child မရှိတော့ဘူး။ G မှာလည်း child မရှိတော့ပါဘူး။ array အခန်းထဲမှာ မရှိတော့သည့် အတွက်ကြောင့် loop ကနေ ထွက်သွားပါမယ်။ node တွေ အားလုံးကိုလည်း ရောက်ခဲ့ပြီးပါပြီ။
Pseudo code နဲ့ စဉ်းစားကြည့်ရအောင်ဗျာ။
current_level = [Root_A]
Loop Until current_level is not empty
    next_level = [] //create empty array for saving
    level_data = [] //to store current level value

    For node in current_level
        level_data.append(node.value)

        if node.left_child is not empty
            next_level.append(node.left_child)

        if node.right_child is not empty
            next_level.append(node.right_child)
    End For Loop

    Print level_data

    current_level = next_level // start again for child data

End Loop
အဲဒါလေးတွေကတော့ စဉ်းစားပြီး ရေးချထားသည့် pseudo code တွေပါ။ ပထမဆုံး ထိပ်ဆုံး root ကနေ စတယ်။ ပြီးရင် သူ့အောက် level က child ကို array ထဲမှာ ထည့်တယ်။ အစကနေ loop ပြန်ပတ်တယ်။ child ထဲမှာ ရှိသည့် left,right ကို array ထဲကို ထည့်တယ်။ အကုန်ပြီးသွားရင် အစကနေ loop ပြန်ပတ်ထားတာကို တွေ့နိုင်ပါတယ်။ ဘယ် အချိန် loop ပတ်နေလဲ ဆိုတော့ child တွေ တစ်ခုမှ မရှိတော့သည့် အဓိ loop ပတ်နေပါတယ်။
python code ပြောင်းရေးကြည့်ရအောင်။
class BinaryTree:

    def __repr__(self):
        return "Binary Tree, Key is " + self.key

    def __init__(self,root):
        self.key = root
        self.left_child = None
        self.right_child = None

    def insert_left(self,new_node):
        if self.left_child == None:
            self.left_child = BinaryTree(new_node)
        else:
            t = BinaryTree(new_node)
            t.left_child = self.left_child
            self.left_child = t

    def insert_right(self,new_node):
        if self.right_child == None:
            self.right_child = BinaryTree(new_node)
        else:
            t = BinaryTree(new_node)
            t.right_child = self.right_child
            self.right_child = t

    def get_right_child(self):
        return self.right_child

    def get_left_child(self):
        return self.left_child

    def set_root_val(self,obj):
        self.key = obj

    def get_root_val(self):
        return self.key

    def bfs(self):
        thislevel = [self]
        while thislevel:
            nextlevel = []
            level = []
            for n in thislevel:
                level.append(n.get_root_val())
                if n.get_left_child() != None:
                    nextlevel.append(n.get_left_child())
                if n.get_right_child() != None:
                    nextlevel.append(n.get_right_child())
            print(",".join(level))
            thislevel = nextlevel


root = BinaryTree("A")

root.insert_left("B")
root.insert_right("C")

b = root.get_left_child()

b.insert_left("D")
b.insert_right("E")

d = b.get_left_child()

d.insert_left("F")
d.insert_right("G")

root.bfs()
အထက်ပါ code မှာ print(",".join(level)) ဆိုသည်မှာ array အား string အနေဖြင့် ပြရန် အတွက် ဖြစ်သည်။ array မှ data များအား comma(,) ဖြင့် ဖော်ပြရန် အတွက် ",".join အား အသုံးပြုထားခြင်း ဖြစ်သည်။
အခု ဆိုရင်တော့ BFS ကို အသုံးပြုပြီးတော့ binary tree ရဲ့ node တွေ အားလုံးကို သွားတတ်ပြီလို့ထင်ပါတယ်။
Binary tree ဟာ left နှင့် right ၂ ခု ပဲရှိပါတယ်။ ကိုယ်တိုင် binary tree မဟုတ်ပဲ တစ်ခုထက် မက node တွေကို child အဖြစ်ထည့်သွင်းသည့် class လည်း အခု အချိန်မှာ လွယ်လင့် တကူ ဖန်တီး နိုင်ပါပြီ။ ထို့ အတူ DFS , BFS ကို ထို Tree structure မှာ ပြန်လည် အသုံးချနိုင်ပါလိမ့်မယ်။
လေ့ကျင့်ခန်း ၉-၂
၁။ အထက်ပါ binary tree တစ်ခု တည်ဆောက်ပါ။ ထို binary tree အတွက် bfs ကို သုံးပြီး search function ကို ရေးပါ။ ဥပမာ ။ F လို့ ထည့်လိုက်လျှင် binary tree တွင် ပါဝင်သောကြောင့် true ဟု return ပြန်ပါမည်။ H ဟု ထည့်လိုက်လျှင် ရှာ မတွေ့သောကြောင့် false ဟု return ပြန်ရမည်။
Tree
ကျွန်တော်တို့ binary tree ကို ပြန်လည်ပြုပြင်ပြီးတော့ Tree တစ်ခု ဖန်တီးပါမယ်။ Binary Tree နဲ့ ကွာခြားတာကတော့ Tree မှာ children တွေက တစ်ခု ထက်မက ပါဝင်ပါတယ်။ Binary Tree မှာ left,right အစား child ပဲ ရှိပါတော့မယ်။
ကျွန်တော်တို့ အနေနဲ့ Binary Tree Class အစား Node class ကို ဖန်တီးပါမယ်။
Node class ထဲမှာတော့ child တွေကို ထည့်ဖို့ list ပါ ပါမယ်။ Node class ထဲမှာတော့ အရင်ကလို value ကို တိုက်ရိုက် မထည့်တော့ပဲ Node class ကိုသာ ထည့်သွင်းပါမယ်။

အထက်ပါ ပုံအတိုင်း code လေး ရေးကြည့်ပါမယ်။
class Node:
    def __init__(self,value):
        self.value = value
        self.child = []

    def __repr__(self):
        return "Value is " + self.value

    def insert_child(self,node):
        self.child.append(node)

    def get_child(self):
        return self.child


root = Node("A")

b = Node("B")
c = Node("C")
d = Node("D")

root.insert_child(b)
root.insert_child(c)
root.insert_child(d)


e = Node("E")
f = Node("F")
g = Node("G")


b.insert_child(e)
b.insert_child(f)
b.insert_child(g)

h = Node("H")
i = Node("I")

c.insert_child(h)
c.insert_child(i)

j = Node("J")

d.insert_child(j)

print(root.value)
print(root.child)
print(root.child[0].value)
print(root.child[0].child[0].value)
child တွေ အကုန်လုံးက list ဖြစ်သည့် အတွက် root.child[0].value ဆိုပြီး ခေါ်နိုင်ပါတယ်။ list ဖြစ်သည့်အတွက် child အရေအတွက် သိချင်ရင်တော့ len(root.child) ဖြင့် အသုံးပြုနိုင်ပါတယ်။
အခု BFS ကို အသုံးပြုကြည့်ရအောင်။
class Node:
    def __init__(self,value):
        self.value = value
        self.child = []

    def __repr__(self):
        return "Value is " + self.value

    def insert_child(self,node):
        self.child.append(node)

    def get_child(self):
        return self.child

    def bfs(self):
        thislevel = [self]
        while thislevel:
            nextlevel = []
            level = []
            for n in thislevel:
                level.append(n.value)
                if len(n.child) > 0:
                    nextlevel = nextlevel + n.child


            if len(level) > 0 :
                print(",".join(level))

            thislevel = nextlevel


root = Node("A")

b = Node("B")
c = Node("C")
d = Node("D")

root.insert_child(b)
root.insert_child(c)
root.insert_child(d)


e = Node("E")
f = Node("F")
g = Node("G")


b.insert_child(e)
b.insert_child(f)
b.insert_child(g)

h = Node("H")
i = Node("I")

c.insert_child(h)
c.insert_child(i)

j = Node("J")

d.insert_child(j)

root.bfs()
Node အောက်မှာ child တွေက array ဖြစ်သည့် အတွက် nextlevel array ကို child နှင့် merge လုပ်ဖို့ လိုပါတယ်။
nextlevel = nextlevel + n.child
python မှာ array ၂ ခုကို merge လုပ်ချင်ရင်တော့ merge = array + array ဆိုပြီး အသုံးပြု နိုင်ပါတယ်။ အထက်ပါ BFS ကို တဆင့်ဆီ ကိုယ်တိုင် trace လိုက်ကြည့်ဖို့ လိုပါတယ်။
လေ့ကျင့်ခန်း ၉-၃

၁။ အထက်ပါ Tree ကို DFS ဖြင့် ရေးသားပါ။ တစ်ခုထက်မက child တွေ ဖြစ်နိုင်သည့် အတွက် preoder နှင့် postorder သာ အသုံးပြုနိုင်ပါသည်။ ထို့ကြောင့် preoder နှင့် postorder function ရေးသားပါ။