အခန်း ၆ ။ List နှင့် Dictionary
ဒီအခန်းမှာ အဓိကအားဖြင့် List နှင့် Dictionary ကို ဖော်ပြပေးသွားပါမယ်။ List နဲ့ Dictionary ဟာ တကယ့် program တွေ ရေးသည့် အခါမှာ မရှိမဖြစ် သိဖို့ လိုအပ်ပါတယ်။ List ကို Array လို့ လည်း ဆိုနိုင်ပါတယ်။ နောက်ပိုင်း sorting တွေ အပိုင်းမှာ Array ရဲ့ အရေးပါပုံတွေ ကို တွေ့ရပါလိမ့်မယ်။ ပြီးခဲ့တဲ့ အခန်းတွေကလည်း List ကို အသုံးပြုပြီးတော့ Stack နဲ့ Queue ကို ဖန်တီးခဲ့တာကို မှတ်မိမယ်လို့ ထင်ပါတယ်။ သို့ပေမယ့် List အကြောင်းကို သေချာ မရှင်းပြခဲ့ပါဘူး။ အခု အခန်းမှာတော့ List နဲ့ Dictionary အကြောင်းကို သေချာစွာ ရှင်းပြပေးပါမယ်။
Lists
List ဆိုတာကတော့ အခန်းကြီးထဲမှာ အခန်း အသေးလေးတွေ ရှိသည့် သဘောပါ။ List ကို programming langauge တွေမှာတော့ Array လို့လည်း ခေါ်ကြပါတယ်။ List ကိုတော့ ကျွန်တော်တို့တွေ Stack အပိုင်းတွေမှာ သုံးခဲ့ဖူးပါတယ်။ တကယ့်လို့ Array/List စတာတွေက programming language မှာ မရှိဘူး ဒါမှမဟုတ် ကိုယ်ပိုင် programming language ကို ဖန်တီးသည့်အခါမှာ Array ဘယ်လို အလုပ်လုပ်လဲ သိအောင် ကိုယ်ပိုင် ဖန်တီးပြီးတော့ ရေးတတ်ဖို့ လိုပါတယ်။
Unordered List Abstract Data Type
Unorder List ဆိုတာကတော့ list ထဲမှာ အစီအစဉ် တကျမဟုတ်ပဲ ဒီ အတိုင်းထည့်ထားတာပါ။ ဥပမာ ။ [4,3,6,1,90,404] စသည့် ဖြင့်ပေါ့။
ကျွန်တော်တို့ ကိုယ်ပိုင် List တစ်ခု ဖန်တီးဖို့ အတွက်
List()ဆိုတဲ့ class ဖန်တီးဖို့လိုမယ်။ init လုပ်သည့်အခါမှာ empty data ဖြစ်နေရမယ်။add(item)ကတော့ item ကို list ထဲမှာ ထည့်မယ်။ ရှေ့ဆုံးနေရာမှာ ထည့်မှာပါ။remove(item)ကတော့ item ကို list ထဲကနေ ထုတ်ဖို့ အတွက်ပါ။search(item)ကတော့ item ဟာ list ထဲမှာ ရှိပြီးပြီလား မရှိသေးဘူးလား စစ်ဖို့ပါ။is_empty()ကတော့ List ထဲမှာ item တွေ မရှိတော့ဘူးလား ဆိုပြီး စစ်ဖို့အတွက်ပါ။true/falseboolean value ကို return ပြန်ပါမယ်။size()ကတော့ item အရေအတွကို return ပြန်ပေးပါမယ်။ Integer value ကို return ပြန်ပေးပါမယ်။append(item)ကတော့ နောက်ဆုံး အခန်းမှာ ထည့်ဖို့ပါ။index(item)ကတော့ item ရဲ့ position ကို ရှာပြီးတော့ return ပြန်မှာပါ။insert(pos,item)ကတော့ item ကို ကိုယ်ထည့်ချင်သည့် နေရာမှာ ထည့်ဖို့ အတွက်ပါ။pop()ကတော့ နောက်ဆုံး အခန်းထဲကနေ ဆွဲထုတ်ဖို့ အတွက်ပါ။ pop အတွက်က ဘာမှ return ပြန် ဖို့ မလိုပါဘူး။pop(pos)ကတော့ အခန်း နံပတ်က ဟာကို ဖျက်မယ်။ ပြီးရင် အဲဒီက data ကို return ပြန်ပေးမယ်။
Implementing an Unordered List: Linked Lists
Unordered List ကို ပုံမှန်အားဖြင့် linked list လို့ ခေါ်ကြပါတယ်။ Value တွေ ဟာ နေရာ အတည်အကျမဟုတ်ပဲ နေရာစုံတွေမှာ ရှိနေပါတယ်။ item တစ်ခုက နောက်ထပ် iteam တစ်ခုကို ထပ်ပြီး ညွှန်းထားပါတယ်။ ဥပမာ အောက်က ပုံကို ကြည့်လိုက်ပါ။

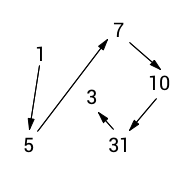
နံပတ်တွေဟာ အစီအစဉ်အတိုင်း မဟုတ်ပဲ ချိတ်ဆက်ထားတာကို တွေ့နိုင်တယ်။ ဒါဆိုရင် class တစ်ခုမှာ လက်ရှိ value နဲ့ နောက်ထပ် value တစ်ခု ကို တွဲပြီး သိမ်းဖို့ လိုတယ်။ နောက်ထပ် value ကလည်း value နဲ့ next ကို သိမ်းဖို့ လိုတယ်။ တနည်းပြောရင် node လေးတွေ ဆက်ထားတာပဲ။
အဲဒီ အတွက် ကျွန်တော်တို့တွေ Node class တစ်ခု တည်ဆောက်ဖို့ လိုလာပြီ။
class Node:
    def __init__(self,init_data) :
        self.data = init_data
        self.next = None

    def get_data(self):
        return self.data

    def get_next(self):
        return self.next

    def set_data(self,new_data) :
        self.data = new_data

    def set_next(self, new_next) :
        self.next = new_next
Class လေးကတော့ ရှင်းရှင်းလေးပါပဲ။ လက်ရှိ ရှိနေသည့် data ကို store လုပ်ထားမယ်။ next data ကို မှတ်ထားမယ်။
code လေးကို အရင်ဆုံး အလုပ်လုပ်လား စမ်းကြည့်ရအောင်။
from node import Node

temp = Node(93)
print(temp.get_data())
အခု Node တစ်ခု ရပြီ။ အဲဒီတော့ Unordered List Class ကို ဆောက်ကြမယ်။ Node ထဲမှာ value သိမ်းမယ်။ Node ရဲ့ next value က နောက်ထပ် node တစ်ခုကို ချိတ်ထားမယ်။ ဒါဆိုရင် ကျွန်တော်တို့တွေ Linked List တစ်ခု ဖန်တီးနိုင်ပြီ။
Unordered List Class
Unordered List ကို Node နဲ့ ဖန်တီးပြီးတော့ တစ်ခုခြင်းစီကို ချိတ်ဆက်သွားရုံပဲ။ ပုံလေးနဲ့ စဉ်းစားကြည့်ရင် အောက်ကလို ပုံလေးပဲ။
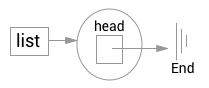
List ကသာ empty ဖြစ်နေရင် head က end နှင့် ချိတ်ထားပါလိမ့်မယ်။

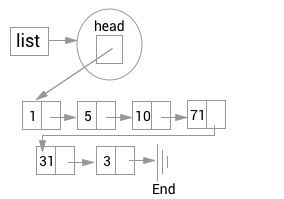
မဟုတ်ဘူးဆိုရင်တော့ head က လက်ရှိ ရှေ့ဆုံး node ကို ညွှန်ထားမယ်။ ရှေ့ node ရဲ့ value က 1 ဖြစ်ပြီးတော့ next ကိုတော့ နောက် ထပ် node တစ်ခု နဲ့ ထပ်ပြီးတော့ ညွှန်ထားတယ်။ ဒီပုံကို မြင့်တော့ ကျွန်တော်တို့တွေ ဘာဖြစ်လို့ node class ကို ဆောက်ခဲ့သလည်းဆိုတာကို သဘောပေါက်လောက်ပါပြီ။ အခု unorder list ဖန်တီးကြည့်ရအောင်။
from node import Node

class UnorderedList:
    def __init__(self):
        self.head = None

mylist = UnorderedList()
ဒါကတော့ အရိုးအရှင်းဆုံး ဦးစွာ class တစ်ခု ဖန်တီးလိုက်တာပေါ့။ head ထဲမှာ None ကိုထည့်ထားတယ်။ ဘာဖြစ်လို့လည်းဆိုတော့ object ကို ဆောက်လိုက်တာနဲ့ empty list တစ်ခုကို ဖန်တီးခြင်လို့ပါ။
Empty
ကျွန်တော်တို့တွေ List ကို empty ဖြစ်မဖြစ် စစ်ဖို့ အတွက် function တစ်ခု ဖန်တီး ရအောင်။ function ကလည်း လွယ်ပါတယ်။ head ကသာ None ဖြစ်နေရင် List က empty ဖြစ်နေတယ်ဆိုတဲ့ အဓိပ္ပာယ်ပါပဲ။
def is_empty(self):
    return self.head == None
code ကတော့
from node import Node

class UnorderedList:
    def __init__(self):
        self.head = None

    def is_empty(self):
        return self.head == None

mylist = UnorderedList()
print(mylist.is_empty())
ရိုးရိုးလေးပါပဲ။ အခု နောက်တစ်ဆင့် သွားရအောင်။
Add
အခု အဆင့်မှာတော့ add function ကို ဖန်တီးကြမယ်။
mylist. = UnorderedList()
mylist.add(3)
mylist.add(31)
mylist.add(71)
mylist.add(10)
mylist.add(5)
mylist.add(1)
ဆိုရင် list က အောက်က ပုံလို ပေါ်ဖို့လိုပါတယ်။
အသစ်ထပ်ဖြည့်လိုက်တိုင်း အနောက်ကို ရောက်ရောက်သွားမယ်။
ပထမဆုံး အကြိမ်မှာ 3 ပဲ ရှိတယ်။ 31 ထပ်ဖြည့်တော့ 31,3 ဖြစ်သွားတယ်။ 71 ထပ်ဖြည့်တော့ 71,3,1,3 ဖြစ်သွားတယ်။ အဲဒီ အတွက် ကျွန်တော်တို့တွေ function တစ်ခု ရေးဖို့ စဉ်းစားရအောင်။
ဘယ်လို ရေးရင် ရမလဲ။ မရေးခင် အရင် ဆုံး စဉ်းစားကြည့်ဖို့ လိုပါတယ်။
variable တစ်ခု ထည့်လိုက်မယ်။
ကျွန်တော်တို့ Node object တစ်ခု ဆောက်ရမယ်။ အဲဒီ ထဲကို ပေးလိုက်သည့် variable ထည့်မယ်။
လက်ရှိ ရှိနေသည့် head ကို ထည့်မယ် Node ရဲ့ next ထဲမှာ ထည့်လိုက်မယ်။
list ရဲ့ head ကို temp မှာထည့်မယ်။ အဲဒါဆိုရင် ရပြီ။
code မရေးခင်မှာ တစ်ဆင့်ခြင်းဆီ စဉ်းစားပြီး ရေးသည့် အခါမှာ အမှားပြန်ပြင်ရတာ ပိုပြီး လွယ်သလို အမှားလည်း နည်းလာနိုင်သည့် အတွက် programming စလေ့လာကာစ လူတွေ အနေနဲ့ အဆင့်တိုင်း စဉ်းစားသွားဖို့ လိုပါတယ်။
ကဲ အခု ကျွန်တော်တို့တွေ add function ရေးကြည့်ရအောင်။
def add(self,item):
    temp = Node(item)
    temp.set_next(self.head)
    self.head = temp
code အပြည့်အစုံက
from node import Node

class UnorderedList:
    def __init__(self):
        self.head = None

    def is_empty(self):
        return self.head == None

    def add(self,item):
        temp = Node(item)
        temp.set_next(self.head)
        self.head = temp

mylist = UnorderedList()
mylist.add(3)
mylist.add(31)
mylist.add(71)
mylist.add(10)
mylist.add(5)
mylist.add(1)
code ကို မရှင်းဖူး ဆိုရင် အောက်က အဆင့်လေးတွေကို ကြည့်ကြည့်ပါ။
၁။ အရင်ဆုံး list head မှာ None ရှိတယ်။
၂။ 3 ကို ထည့်လိုက်တော့ , temp = Node(3) ဆိုပြီး temp object ကို ဆောက်လိုက်တယ်။ အဲဒီ အချိန်မှာ temp ရဲ့ data က 3 ဖြစ်ပြီးတော့ next ကတော့ None ဖြစ်နေမယ်။
၃။ temp.set_next(self.head) လို့ ဆိုသည့်အတွက် temp ရဲ့ next ထဲမှာ လက်ရှိ head ကို ဝင်သွားပြီ။ head က None ဖြစ်သည့်အတွက် next ကလည်း None ဖြစ်နေမှာပဲ။
၄။ self.head ကို temp ထည့်လိုက်သည့်အတွက်ကြောင့် self.head က Node(3) ဖြစ်သွားပြီ။
၅။ 31 ကို ထပ်ဖြည့်တော့လည်း ဒီအတိုင်းပဲ။ သို့ပေမယ့် temp.set_next(self.head) ကြောင့် Node(31) ရဲ့ next က ပြီးခဲ့ Node(3) ဖြစ်သွားတယ်။
၆။ self.head က Node(31) ဖြစ်သွားတာကြောင့် self.head ထဲမှာ Node(31)->Node(3) ဆိုပြီး ဖြစ်သွားပါပြီ။
ဒါဆိုရင်တော့ Add လုပ်သည့် ကိစ္စကို နားလည်လောက်ပြီ။ အခု size (အရေအတွက်) ဘယ်လောက်ရှိလဲ ဆိုတာကို သိရအောင် function ရေးကြည့်ရအောင်။
Size
အခု self.head ထဲမှာ Node တွေ အများကြီးရှိနေပြီ။ Size ကို သိဖို့ကတော့ Node အရေအတွက် ဘယ်လောက် ရှိလဲ ဆိုတာ သိဖို့လိုတယ်။ Node တွေက တစ်ခုနဲ့ တစ်ခုချိတ်ထားပြီးတော့ နောက်ဆုံး next က None ဖြစ်သွားသည့် အထိပဲ။
Pseudo code လေးနဲ့ စဉ်းစားကြည့်ရအောင်။
Set current is head
Set count is zero
Loop Until current is None
    Increase count
    current = current.get_next()
Return count
Pseudo code အရ ဆိုရင် current ထဲမှာ head ကို ထည့်မယ်။ ပြီးရင် count ကို သုညကနေ စမှတ်မယ်။ current ကို None မဖြစ်မခြင်း loop ပတ်မယ်။ loop ထဲရောက်တိုင်း count ကို ၁ တိုးသွားမယ်။ ပြီးရင် current ကို လက်ရှိ current ရဲ့ next ကို ထည့်မယ်။ loop က ထွက်သွားရင် count ကို return ပြန်ပေးမယ်။ code လေးက ရှင်းရှင်းလေးပါ။ အဲဒါကို python နဲ့ ပြောင်းရေးကြည့်ရအောင်။
def size(self):
    current = self.head
    count = 0
    while current != None:
        count = count + 1
        current = current.get_next()
    return count
code အပြည့်အစုံက
from node import Node

class UnorderedList:
    def __init__(self):
        self.head = None

    def is_empty(self):
        return self.head == None

    def add(self,item):
        temp = Node(item)
        temp.set_next(self.head)
        self.head = temp

    def size(self):
        current = self.head
        count = 0
        while current != None:
            count = count + 1
            current = current.get_next()
        return count

mylist = UnorderedList()

print(mylist.size())

mylist.add(3)
mylist.add(31)
mylist.add(71)
mylist.add(10)
mylist.add(5)
mylist.add(1)

print(mylist.size())
တကယ့်ကို လွယ်လွယ်လေးပါ။ အခု ကျွန်တော်တို့တွေ ရှိသမျှ node တွေ ကုန်အောင် loop ပတ်လို့ ရသွားပြီ။ ဒါဆိုရင် search လုပ်လို့ ရပြီပေါ့။
Search
Search လုပ်မယ်ဆိုရင် ပြီးခဲ့တဲ့ size အတိုင်း loop ပတ်ဖို့ လိုတယ်။ တွေ့ခဲ့ရင် loop ထဲက ထွက်မယ်။ ဒါပဲ ကွာလိမ့်မယ်။
def search(self,item):
    current = self.head
    found = False
    while current != None and not found:
        if current.get_data() == item:
            found = True
        else:
            current = current.get_next()
    return found
လက်ရှိ ရှိသည့် code မှာ ပြောင်းလိုက်ရင်
from node import Node

class UnorderedList:
    def __init__(self):
        self.head = None

    def is_empty(self):
        return self.head == None

    def add(self,item):
        temp = Node(item)
        temp.set_next(self.head)
        self.head = temp

    def size(self):
        current = self.head
        count = 0
        while current != None:
            count = count + 1
            current = current.get_next()
        return count

    def search(self,item):
        current = self.head
        found = False
        while current != None and not found:
            if current.get_data() == item:
                found = True
            else:
                current = current.get_next()
        return found

mylist = UnorderedList()

mylist.add(3)
mylist.add(31)
mylist.add(71)
mylist.add(10)
mylist.add(5)
mylist.add(1)

print(mylist.search(10))
print(mylist.search(12))
Size ကို နားလည်တယ်ဆိုရင် search code ကလည်း ရိုးရှင်းပါတယ်။ current က None ရောက်သည့်အထိ loop ပတ်တယ်။ loop ထဲက ဘယ်အချိန်ထွက်မလဲဆိုတော့ current က None ဖြစ်သွားချိန် ဒါမှမဟုတ် found က true ဖြစ်သွားချိန်ပေါ့။
while current != None and not found:
ဒီ code မှာ and ကို အသုံးပြုထားတာ တွေ့နိုင်ပါတယ်။ and ရဲ့ သဘောက တစ်ခု False ဖြစ်ရင် အကုန် false ပဲ။ ၂ ခု လုံး true ဖြစ်မှ true ဖြစ်သည့် သဘောကို သိကြပါလိမ့်မယ်။ code အရ current != None ကလည်း True ဖြစ်ရမယ်။ not found ဆိုသည့် အတွက် found ကလည်း false ဖြစ်ရမယ်။ found က false ဖြစ်မှသာ not false ဆိုပြီး true ကို ရမှာပါ။ ၂ ခုလုံး true ဖြစ်နေသ၍ looping က အလုပ်လုပ်နေပါမယ်။
ကိုယ်ရှာနေသည့် item ကိုသာ တွေ့ရင် found က true ဖြစ်သွားပြီးတော့ looping ထဲကနေ ထွက်သွားပါလိမ့်မယ်။
Remove
အခု remove အပိုင်းကို စဉ်းစားကြရအောင်။ item တစ်ခုပေးလိုက်မယ်။ အဲဒီ item ကို ဖျက်ဖို့ လိုတယ်။ သူ့ရဲ့ အရှေ့က သူ့ကို ချိတ်ထားသည့် Node နဲ့ သူ့ရဲ့ အနောက်က သူ့ကို ချိတ်ထားသည့် Node ၂ ခုကို ချိတ်ပေးဖို့လိုတယ်။ သူကတော့ နည်းနည်း ရှုပ်သွားပြီ။
ကျွန်တော်တို့မှာ
head -> 31 -> 10 -> 8 -> 4 -> 3 -> None
ဆိုပြီးရှိရင် 8 ကို remove လုပ်လိုက်ရင် အောက်ကလို ဖြစ်သွားမယ်။
head -> 31 -> 10 -> 4 -> 3 -> None
အဲဒီတော့ ကျွန်တော်တို့ 8 ကို ဖျက်ဖို့ အတွက် 8 ရှေ့ ရဲ့က Node ကို မှတ်ထားမယ်။ အပေါ်က ပုံအတိုင်း ဆိုရင်တော့ 10 ပေါ့။ Node(10) ရဲ့ next ကို Node(8) အစား Node(4) ချိတ်ပေးလိုက်ရုံပဲ။ Node(4) ဆိုတာကတော့ Node(8) ရဲ့ next ပါ။
ဒီတော့ Pseudo code လေး ရေးကြည့်ရအောင်။
SET current = head
SET previous = None
SET found = false
Loop Until found OR current is None
    IF current.data == item THEN
        found = true
    ELSE
        previous = current
        current = current.next
IF found == true THEN
    IF previous == None THEN
        head = current.next
    ELSE
        previous.next = current.next
ကျွန်တော်တို့တွေဟာ အရင် အတိုင်း loop ကို current ဟာ None ဖြစ်နေသည့် အချိန် သို့မဟုတ် not found ဖြစ်သွားသည့်အချိန် ထိ loop ပတ်ဖို့ လိုပါတယ်။ အကယ်၍ ရှာတွေ့ခဲ့ရင် ဖြစ်နိုင်ခြေ ၂ ခု ရှိတယ်။ ပထမ အခန်းဖြစ်နိုင်တာ ရယ် သို့မဟုတ် ပထမ အခန်း မဟုတ်တာရင်။ ပထမ အခန်းဆိုရင်တော့ previous က None ဖြစ်နေမှာပါ။ အဲဒီ အခါမှာ head ကို next နဲ့ ချိတ်ပေးလိုက်ရုံပဲ မဟုတ်ရင်တော့ previous ရဲ့ next ကို current ရဲ့ next နဲ့ ချိတ်ပေးဖို့ လိုပါတယ်။
python နဲ့ ရေးကြည့်ရအောင်။
def remove(self,item) :
    current = self.head
    previous = None
    found = False
    while current != None and not found:
        if current.get_data() == item:
            found = True``````````````````
        else:
            previous = current
            current = current.get_next()
    if found :
        if previous == None:
            self.head = current.get_next()
        else:
            previous.set_next(current.get_next())


code တွေအကုန်ပြန် စုလိုက်ရင်

from node import Node

class UnorderedList:
    def __init__(self):
        self.head = None

    def is_empty(self):
        return self.head == None

    def add(self,item):
        temp = Node(item)
        temp.set_next(self.head)
        self.head = temp

    def size(self):
        current = self.head
        count = 0
        while current != None:
            count = count + 1
            current = current.get_next()
        return count

    def search(self,item):
        current = self.head
        found = False
        while current != None and not found:
            if current.get_data() == item:
                found = True
            else:
                current = current.get_next()
        return found

    def remove(self,item) :
        current = self.head
        previous = None
        found = False
        while current != None and not found:
            if current.get_data() == item:
                found = True
            else:
                previous = current
                current = current.get_next()
        if found :
            if previous == None:
                self.head = current.get_next()
            else:
                previous.set_next(current.get_next())

mylist = UnorderedList()

mylist.add(3)
mylist.add(31)
mylist.add(71)
mylist.add(10)
mylist.add(5)
mylist.add(1)

print(mylist.size())
mylist.remove(5)
print(mylist.size())
mylist.remove(100)
print(mylist.size())
python code လေးကလည်း ရိုးရှင်းပါတယ်။ အခုဆိုရင်တော့ ကျွန်တော်တို့တွေ remove အပိုင်း ပြီးသွားပါပြီ။
ကျန်တဲ့ append,insert,index,pop စတာတွေကိုတော့ လေ့ကျင့်ခန်း အနေနဲ့ ကိုယ်တိုင် ရေးဖို့ လိုအပ်ပါတယ်။
The Ordered List Abstract Data Type
အခု ကျွန်တော်တို့ ထပ်ပြီးတော့ ordered list ကို ဖန်တီးကြည့်ရအောင်။ Ordered List ဆိုတာကတော့ unordered list လို မဟုတ်ပဲ နံပတ်စဉ် လိုက်တိုင်း စီထားသည့် list ပေါ့။ Order List မှာ ဘာတွေပါမလဲဆိုတော့
OrderList()ဆိုတဲ့ class တစ်ခု ဖန်တီးမယ်။ return ကတော့ empty list ပြန်မယ်။emove(item)ကတော့ list ထဲမှာ ရှိသည့် item ကို ဖျက်မှာပါ။search(item)ကတော့ list ထဲမှာ item ပါမပါ ရှာပါလိမ့်မယ်။is_empty()ကတော့ list က empty ဟုတ်မဟုတ် အတွက်ပါ။size()ကတော့ list ထဲမှာ item ဘယ်လောက် ရှိသလဲဆိုတာကို သိဖို့ အတွက်ပါ။index(item)ကတော့ list ထဲမှာ item က ဘယ် position , ဘယ် အခန်း မှာ ရှိလဲ ဆိုတာကို return ပြန်ပေးမှာပါ။pop()ကတော့ နောက်ဆုံး အခန်းကို ထုတ်မယ်။ အဲဒီ value ကို return ပြန်ပေးမယ်။pop(pos)ကတော့ နောက်ဆုး အခန်းမဟုတ်ပဲ ပေးလိုက်သည့် အခန်း နံပတ်ကို ဖျက်မယ်။ ပြီးရင် အဲဒီ အခန်းက value ကို return ပြန်ပေးပါမယ်။
Implementing an Ordered List: Linked Lists
Unordered List ကို ဖန်တီးထားပြီးပြီ ဆိုတော့ ကျွန်တော်တို့တွေ အတွက် Ordered List ဖန်တီးဖို့ မခက်ခဲတော့ပါဘူး။ Ordered List ကတော့ နံပတ်တွေကို အစီအစဉ်လိုက် စီထားသည့် list ပါ။ Unordered List မှာကတော့ နံပတ်စဉ်တွေ အတိုင်း list ထဲမှာ ရှိနေတာ မဟုတ်ပါဘူး။ ဒါကြောင့် မတူညီတာကတော့ list ထဲကို item ထည့်တော့မယ်ဆိုရင် ထည့်မယ့် value ထက် ကြီးတာကို သွားရှာရမယ်။ သူ့ရဲ့ အရှေ့မှာ သွားထည့်ရမယ်။ Unordered List လိုမျိုး ထည့်ချင်သလို ထည့်လို့ရတာ မဟုတ်ပါဘူး။
Ordered List ပုံစံကို ကြည့်ရအောင်
Unordered List နဲ့ ဆင်သယောက်ပါပဲ။ ကွာတာကတော့ သူက ကြီးစဉ်ငယ်လိုက် အစီအစဉ်လိုက် စီထားတာပါ။

အခု Class တစ်ခု ကို ဖန်တီးကြည့်ရအောင်
class OrderedList:
   def __init__(self):
      self.head = None
ဒါကတော့ အရင်အတိုင်းပဲ။ ပုံမှန် class တစ်ခု ဖန်တီးထားတာပါ။
Unordered List အကြောင်းသိပြီးပြီ ဖြစ်သည့် အတွက် ကျွန်တော်တို့တွေ add ကို နောက်မှ ရေးမယ်။ အခု search လေးက စလိုက်ရအောင်။
def search(self, item):
    current = self.head
    found = False
    stop = False
    while current != None and not found and not stop:
    if current.get_data() == item:
        found = True
    else:
        if current.get_data() > item:
        stop = True
        else:
        current = current.get_next()
   return found
code ဖတ်လိုက်တာနဲ့ အခုဆို နားလည်လောက်ပြီလို့ ထင်ပါတယ်။ Search လုပ်တယ် ၊ ရှာတယ် ဆိုသည့် သဘောကတော့ ရှင်းရှင်းလေးပါ။ တစ်ခန်းခြင်းစီမှာ ဒီ value ဟုတ်လား ၊ မဟုတ်ခဲ့ရင် value က အခု လက်ရှိ အခန်းထက် ကြီးနေလားဆိုပြီး စစ်ပါတယ်။ ဘာလို့ စစ်ရလဲ ဆိုတော့ ဂဏန်းတွေက ကြီးစဉ်ငယ်လိုက် ရှိနေတော့ ကြီးသွားရင်တော့ သေချာပြီ နောက်ဘက်အခန်းတွေမှာ လည်း မရှိတော့ဘူး။ အကယ်၍ မရှိခဲ့ဘူး ဆိုရင်တော့ နောက်အခန်းကို ဆက်သွားပြီး ရှာဖို့ လိုပါလိမ့်မယ်။
ဘာကြောင့် Search ကို အဓိက ထားပြီး အရင်ပြောရသလဲ ဆိုတော့ Search ပိုင်းနားလည် သဘောပေါက်မှ Ordered List မှာ Add အပိုင်း ထည့်လို့ ရပါလိမ့်မယ်။ Ordered List က ထည်မယ်ဆိုရင် ထည့်မယ် value ထက် ကြီးထက်တာကို ရှာရမယ်။ ပြီးရင် အဲဒီ အရှေ့မှာ ထည့်ဖို့ လိုပါတယ်။
def add(self, item):
   current = self.head
   previous = None
   stop = False
   while current != None and not stop:
      if current.get_data() > item:
         stop = True
      else:
         previous = current
         current = current.get_next()
   temp = Node(item)
   if previous == None:
      temp.set_next(self.head)
      self.head = temp
   else:
      temp.set_next(current)
      previous.set_next(temp)
အခု add function ကို ရေးပြီးပါပြီ။ code လေး တချက်လောက် ကြည့်ရအောင်။ Search မှာကတော့ found ဆိုပြီး အသုံးပြုထားပြီးတော့ add မှာကတော့ previous ကို အသုံးပြုထားပါတယ်။ အခု လက်ရှိ အခန်းမတိုင်ခင်က အခန်းပေါ့။ ဒါမှသာ ကျွန်တော်တို့တွေဟာ လက်ရှိ အခန်းနဲ့ သူ့ရဲ့ ပြီးခဲ့တဲ့ အခန်းကြားမှာ value ကို ထည့်လိုက်ရင် ရပါပြီ။
Search အတိုင်းပါပဲ။ ကျွန်တော်တို့တွေဟာ Loop ပတ်ပြီးတော့ ထည့်မယ် item ထက်ကြီးတာကို ရှာတယ်။ နောက်ဆုံး အခန်း မရောက်မခြင်း ရှာပါတယ်။ ဒါမှမဟုတ် current item က လက်ရှိ item ထက်ကြီးသွားမလားဆိုပြီးတော့လည်း ရှာပါတယ်။ မကြီးဘူးဆိုရင်တော့ previous ထဲမှာ current ကို ထည့်တယ်။ current ကိုတော့ current ရဲ့ next ကို ထည့်ပါတယ်။
ပြီးသွားပြီဆိုရင် နောက်ဆုံး အခန်းရောက်သွားလား သိရင်အောင်
if previous == None:
ဆိုပြီးရှာပါတယ်။ နောက်ဆုံး အခန်းဆိုရင်တော့ နောက်ဆုံး အခန်းမှာ ထည့်လိုက်ရုံပဲပေါ့။
မဟုတ်ခဲ့ဘူးဆိုရင်တော့ item ရဲ့ next ကို current ထည့်မယ်။ previous ရဲ့ next ကိုတော့ item ရဲ့ Node လေး ချိတ်ပေးလိုက်ရုံပါပဲ။ Code က လွယ်လွယ် နဲ့ ရိုးရိုး ရှင်းရှင်းပါပဲ။ ကျွန်တော် အဓိက Search ရဲ့ Add ပဲ ပြောသွားတယ်။ ကျန်တာတွေကို Unordered List နဲ့ ပေါင်းလို့ ရတယ်။
Unordered List မှာ exercise လုပ်ဖြစ်သည့်သူတွေ အနေနဲ့ pop အပိုင်းကို စဉ်းစားဖူးပါလိမ့်မယ်။
pop ကို ရေးသားဖို့အတွက် စဉ်းစားကြည့်ရအောင်။
ပထမဆုံး စဉ်းစားရမှာက နောက်ဆုံး အခန်းကို ဘယ်လိုသွားမလဲ ? နောက်ဆုံး အခန်းကို ဘယ်လို ဖျက်မလဲ ကျွန်တော်တို့ အရင်က ရေးထားသလိုပါပဲ။ နောက်ဆုံး အခန်းက None ဖြစ်တယ်။ ဒါဆိုရင်တော့ လက်ရှိ Node ရဲ့ next value ကသာ None ဖြစ်သွားခဲ့ရင် အဲဒါက နောက်ဆုံး အခန်းပဲ။ ဒီတော့ current ရဲ့ next က None မဖြစ်မခြင်း Loop ပတ်ဖို့ လိုတယ်။
while current.get_next() != None :
နောက်တစ်ခုက နောက်ဆုံးခန်း ဘယ်လိုဖျက်မလဲ ဆိုတာက လွယ်သွားပြီ။ လက်ရှိ current ရဲ့ ရှေ့ အခန်းမှာ next ကို None ပေးလိုက်ရုံပါပဲ။
def pop(self) :
        current = self.head
        previous = None
        while current.get_next() != None :
            previous = current
            current = current.get_next()

        previous.set_next(None)
        return current.get_data()
ကဲ အခု ကျွန်တော်တို့ Ordered List class တစ်ခု လုံး စမ်းကြည့်ရအောင်။
from node import Node

class OrderedList:
    def __init__(self):
        self.head = None

    def is_empty(self):
        return self.head == None

    def add(self, item):
        current = self.head
        previous = None
        stop = False
        while current != None and not stop:
            if current.get_data() > item:
                stop = True
            else:
                previous = current
                current = current.get_next()
        temp = Node(item)
        if previous == None:
            temp.set_next(self.head)
            self.head = temp
        else:
            temp.set_next(current)
            previous.set_next(temp)

    def size(self):
        current = self.head
        count = 0
        while current != None:
            count = count + 1
            current = current.get_next()
        return count

    def search(self, item):
        current = self.head
        found = False
        stop = False
        while current != None and not found and not stop:
            if current.get_data() == item:
                found = True
            else:
                if current.get_data() > item:
                    stop = True
                else:
                    current = current.get_next()
        return found

    def remove(self,item) :
        current = self.head
        previous = None
        found = False
        while current != None and not found:
            if current.get_data() == item:
                found = True
            else:
                previous = current
                current = current.get_next()
        if found :
            if previous == None:
                self.head = current.get_next()
            else:
                previous.set_next(current.get_next())

    def pop(self) :
        current = self.head
        previous = None
        while current.get_next() != None :
            previous = current
            current = current.get_next()

        previous.set_next(None)
        return current.get_data()

mylist = OrderedList()

mylist.add(3)
mylist.add(31)
mylist.add(71)
mylist.add(10)
mylist.add(5)
mylist.add(1)

print(mylist.size())
mylist.remove(5)
print(mylist.size())
print(mylist.pop())
print(mylist.size())
Dictionary
အခု List ပိုင်းကို ကျွန်တော်တို့တွေ နားလည် သဘောပေါက်လောက် ရှိပါပြီ။ Programming မှာ Array , List အပြင် လူသုံးများသည့် နောက်ထပ် data type တစ်ခုကတော့ Dictionary ပါ။ Java မှာတော့ HashMap အနေနဲ့ သုံးတယ်။ PHP မှာတော့ associative array လို့ ခေါ်တယ်။ Dictionary ရဲ့ အဓိက ပိုင်းကတော့ Key Value ပါ။ value တွေကို Key နဲ့ သိမ်းပြီးတော့ ပြန်ထုတ်မယ်ဆိုရင် အခန်းနံပတ်နဲ့ မဟုတ်ပဲ Key နဲ့ ပြန်ထုတ်မှ ရပါမယ်။
dict = {'Name': 'Aung Ko', 'Age': 7}

print("NAME: " + dict["Name"])
print("Age: " + str(dict["Age"]))
အဲဒီ code မှာ ကြည့်လိုက်ရင် Name,Age စတာတွေက Key ပါ။ Key ကို ထည့်လိုက်သည့် အခါမှာ Value ရလာတာကို တွေ့ရမှာပါ။ dict["Name"] အစား dict["Aung Ko"] ကို ခေါ်ရင် Name ဆိုပြီး ထွက်လာမှာ မဟုတ်ပါဘူး။ Value ကနေ Key ကို ပြန်ခေါ်လို့ မရပါဘူး။
နောက်ထပ် ဥပမာ ကြည့်ရအောင် ဗျာ။
person1 = {'Name': 'Aung Ko', 'Age': 7}
person2 = {'Name': 'Ko Ko', 'Age': 8}

room = [person1,person2]

for person in room:
    print("NAME: " + person["Name"])
    print("Age: " + str(person["Age"]))
    print("======")
ကျွန်တော်တို့ Dictionary ကို array ထဲမှာ ထည့်လိုက်တယ်။ တနည်းပြောရင် အခန်းထဲမှာ ရှိသည့် လူတွေ အကုန် array ထဲမှာ ထည့်ပြီးတော့ ပြန်ထုတ်ထားသည့် သဘောပေါ့။
for person in room:
ဆိုတာကတော့ room array ကို loop ပတ်မယ်။ အထဲမှာ ရှိသည့် data ကို person ထဲမှာ ထည့်မယ်။ ဒါဆိုရင် person က dictionary ဖြစ်သွားပါပြီ။ အဲဒီ ထဲကနေ key နဲ့ ပြန်ပြီး ဆွဲထုတ်ထားတာပါ။ ပြီးခဲ့တဲ့ code နဲ့ သဘောတရား အတူတူပါပဲ။
Updating
Dictionary မှာ Value ကို အမြဲပြန်ပြင်ပြီး Update လုပ်လို့ ရပါတယ်။
dict = {'Name': 'Aung Ko', 'Age': 7}

dict["Age"] = 9

print("NAME: " + dict["Name"])
print("Age: " + str(dict["Age"]))
Update လုပ်သည့်အခါမှာလည်း Key နဲ့ တိုက်ရိုက် update လုပ်နိုင်ပါတယ်။
Delete Dictionary
Key ကို ပြန်ပြီး ဖျက်ချင်ရင်
dict = {'Name': 'Aung Ko', 'Age': 7}

dict["Age"] = 9

del dict['Name']

print("NAME: " + dict["Name"])
print("Age: " + str(dict["Age"]))
ဒီ code မှာ ဆိုရင် Name ကို ဖျက်လိုက်သည့်အတွက် ပြန်ထုတ်သည့် အခါမှာ Error ဖြစ်ပါလိမ့်မယ်။
ဒီလောက်ဆိုရင်တော့ Dictionary ကို အနည်းငယ် သဘောပေါက်လောက်ပါပြီ။ Dictionary ဟာ နောက်ပိုင်း programming တွေ ရေးသည့် အခါမှာ မဖြစ်မနေ အသုံးဝင်လာပါလိမ့်မယ်။ Web Development ပိုင်းတွေ သွားသည့်အခါမှာ API နဲ့ ချိတ်ဆက်ပြီး ရေးသည့် အပိုင်းမှာ Dictionary ရဲ့ အရေးပါပုံတွေကို တွေ့လာရလိမ့်မယ်။ အခုစာအုပ်မှာတော့ အခြေခံ သဘောတရားလေးကိုသာ ကျွန်တော် ဖော်ပြထားပါတယ်။
JSON
Dictionary ကို နားလည်ပြီဆိုရင်တော့ JSON အကြောင်းကို နားလည်လွယ်ပါပြီ။ JSON ဟာ web application အတွက် API တွေရေးရာမှာ အသုံးများသည့် format တစ်ခုပါ။ API ဆိုတာကတော့ Apllication Program Interface ဖြစ်ပါတယ်။ ဥပမာ။။ user information ပေးပါ ဆိုပြီး client က request ပြုလုပ်လျှင် ဒါတွေကတော့ user information ပါ ဆိုပြီး return ပြန်ပေးပါလိမ့်မယ်။
ဥပမာ။
{
	"id" : 1,
	"name" : "Kaung Kaung",
	"age" : 8
}
ဒါကို ကြည့်လိုက်ရင် Dictionary နှင့် တူပါသလား ဆိုပြီး သဘောပေါက်နိုင်ပါတယ်။ Dictionary နဲ့ JSON ကွာခြားချက်ကတော့ Dictionary ဟာ python မှာ ရှိသည့် data type တစ်ခု ဖြစ်ပါသည်။ JSON ကတော့ format ရှိသည့် string သို့မဟုတ် text ပါ။ Dictionary ၏ data type မှာ python ရဲ့ instant object ကို ထည့်သွင်းနိုင်သည်။ JSON မှာကတော့ Number, String , Boolean, JSON Array နှင့် JSON Object ကို သာထည့်သွင်းနိုင်ပါသည်။
ဥပမာ။
{
	"id" : 1,
	"name" : "Kaung Kaung",
	"age" : 22
}
အထက်ပါ ပုံစံသည် JSON object ပါ။
[
  {
    "id" : 1,
    "name" : "Kaung Kaung",
    "age" : 8
  },
  {
    "id" : 2,
    "name" : "Yan Kyi Naung",
    "age" : 9
  },
  {
    "id" : 3,
    "name" : "Zaw Htet",
    "age" : 10
}
]
အထက်ပါ ပုံစံသည် JSON Array ဖြစ်ပါသည်။ JSON Array ကို [ နှင့် စပြီး ] နှင့် ဆုံးပါသည်။
{
  "id" : 1,
  "name" : "Kaung Kaung",
  "age" : 8,
  "address" : {
    "no" : 129,
    "street" : "31 St",
    "city" : "Yangon",
    "country" : "Myanmar"
  }
}
JSON သည် အထက်တွင် ဖော်ပြထားသည့် ပုံစံမျိုး JSON Object ထဲတွင် နောက်ထပ် JSON Object ရှိနိုင်သည်။
{
	"id": 1,
	"name": "Kaung Kaung",
	"age": 8,
	"addresses": [{
			"no": 129,
			"street": "31 St",
			"city": "Yangon",
			"country": "Myanmar"
		},
		{
			"no": 89,
			"street": "23 St",
			"city": "Yangon",
			"country": "Myanmar"
		}
	]
}
JSON သည် အထက်တွင် ဖော်ပြထားသည့် ပုံစံမျိုး JSON Object ထဲတွင် နောက်ထပ် JSON Array ရှိနိုင်သည်။
JSON ကို အဓိကအားဖြင့် data parsing အဖြင့် အသုံးများပါသည်။ နောက်ပိုင်း web development ပြုလုပ်သည့် အခါ ပိုမို နားလည်လာပါမည်။.
အခု JSON string ကို Dictionary ပြောင်းလဲပါမည်။ json အတွက် အောက်ပါ code ကို import လုပ်ရန် လိုအပ်ပါသည်။
import json
JSON string တစ်ခု တည်ဆောက်ပါမည်။
json_data = '{"a": 1, "b": 2, "c": 3, "d": 4, "e": 5}'
ထို JSON string အား Dictionary ပြောင်းလဲပါမည်။
sample_dict = json.loads(json_data)
အခုဆိုလျှင် json string သည် Dictionary ဖြင့်သွားပါမည်။
print(sample_dict['a'])
အခုဆိုလျှင် 1 ကို ဖော်ပြပေးမည် ကို တွေ့ရပါမည်။
အခု dictionary object ကို JSON ပြောင်းကြည့်ပါမည်။
print(json.dumps(sample_dict))
အထက်ပါ code တွင် json.dumps သည် dictionary object အား json string ပြောင်းပေးခြင်း ဖြစ်သည်။ သတိထားရမှာသည် dictionary ထဲတွင် string,number နှင့် boolean value သာ ဖြစ်ရမည် ဖြစ်သည်။
JSON ကို config file , API စသည်တို့တွင် အသုံးများသည့် အတွက် အခြေခံ သဘောတရား နားလည်အောက် ဖော်ပြထားခြင်းဖြစ်ပါသည်။
လေ့ကျင့်ခန်း ၆။
၁။ အောက်ပါ code တွင် gender သည် male ဖြစ်သော သူများကို ဖော်ပြပါ။
room = [{'Name': 'Aung Ko', 'Age': 7, 'Gender' : 'male'}, {'Name': 'Ko Ko', 'Age': 8, 'Gender' : 'male'},{'Name': 'Aye Aye', 'Age': 7, 'Gender' : 'female'},{'Name': 'Htet Htet', 'Age': 8, 'Gender' : 'female'},{'Name': 'Win Aung', 'Age': 7, 'Gender' : 'male'}]
၂။ အထက်ပါ code တွင် room ထဲတွင် ရှိသော လူများ၏ စုစုပေါင်း အသက်ကို ဖော်ပြသော code ရေးပြပါ။