Styles for Nested Tags
CSS ကို အသံုးျပဳရမွာ ကၽြန္တာ္တုိ႕ေတြ အေနနဲ႕ class ေတြ tag ေတြကို အဆင့္ဆင့္ ျပီး အသံုးျပဳလို႕ရပါတယ္။ ေအာက္က code ေလးကို တခ်က္ေလ့လာၾကည့္ရေအာင္။
<html>
<head>
    <title>Nested CSS</title>
    <link rel="stylesheet" type="text/css" href="style.css">
</head>
<body>
<section class='first'>
    <p>This is first paragraph.</p>
    <div id="example">
        <p>This is second paragraph.</p>
    </div>
</section>

<section class='second'>
    <p>This is first paragraph.</p>
    <div id="example">
        <p>This is second paragraph.</p>
    </div>
</section>
</body>
</html>
အထက္ပါ code မွာ ကၽြန္ေတာ္ section ၂ ခုကို အသံုးျပဳထားပါတယ္။ ပထမ section မွာ paragraph ၂ခု ပါသလို ဒုတိယ section မွာလည္း paragraph ၂ ခု ပါပါတယ္။ သူ႕မွာ သံုးထားတဲ့ style.css ကို ၾကည့္ၾကည့္ရေအာင္။
p {
    color:red;
}
section.first p{
    color:blue;
}

section.second > p {
    color: purple;
}
တကယ္လုိ႕ ကၽြန္ေတာ္တုိ႕ေတြ pagraph အားလံုးရဲ႕ စာကို ေျပာင္းခ်င္ရင္ p လုိ႕ ေခၚလိုက္ရင္ရပါျပီ။ သို႕ေပမယ့္ ပထမ section ရဲ႕ paragraph ကို သာ အေရာင္ေျပာင္းခ်င္တဲ့အတြက္ section.first p ဆုိျပီး သံုးထားပါတယ္။ section tag ျဖစ္ရမယ္ အဲဒီ tag ရဲ႕ class က first ျဖစ္ရမယ္။ အဲဒီ first ရဲ႕ ေအာက္က p ေတြကို ဒီ css သံုးမယ္ဆုိျပီး ေရးထားတာပါ။
section.second > p ကေတာ့ နည္းနည္းေလး ကြဲျပာင္းပါယတ္။ section tag ျဖစ္ရမယ္။ class နာမည္က second ျဖစ္ရမယ္။ သူ႕ရဲ႕ ေအာက္က p ကို သာ ေျပာင္းမယ္။ ကၽြန္ေတာ္တုိ႕ .second ရဲ႕ ေအာက္မွာ div တစ္ခု ရိွတာကို ေတြ႕ႏိုင္ပါတယ္။ အဲဒီ ေအာက္က p က .second ေအာက္မွာ ရိွတဲ့ p class မွာ မဟုတ္ေတာ့တဲ့အတြက္ သူက default color အနီ ေရာင္သာ ျပေနပါလိမ့္မယ္။
အဲဒီ code ေလးကို run လိုက္ရင္ ေအာက္ကလိုမ်ဳိးေလး ျမင္ရပါလိမ့္မယ္။
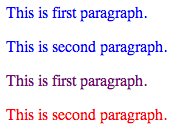
Figure 3-9
အခု ဆုိရင္ chapter 3 ျပီးဆံုးပါျပီ။ Chapter 3 မွာ CSS နဲ႕ ပတ္သက္ျပီး အေျခခံ အဆင့္ထိ သိေလာက္ျပီလုိ႕ ထင္ပါတယ္။ Chapter 3 မွာ tag , class , ID စတာေတြကို CSS နဲ႕ တြဲသံုးျပီး သံုးနည္းကို ေဖာ္ျပထားပါတယ္။ ေနာက္ျပီး chapter မွာေတာ့ text styling နဲ႕ ပတ္သက္ျပီးေတာ့ ဆက္လက္ ေလ့လာႏိုင္ပါတယ္။